صيانة اللاب توب ( الكمبيوتر المحمول ) Laptop Repair Workshop

أدوات الموضوع

qazxswedccc
:: مهندس ::
تاريخ التسجيل: Jun 2007
المشاركات: 24
نشاط [ qazxswedccc ]
قوة السمعة:0
قديم 08-05-2008, 11:02 AM المشاركة 1   
افتراضي ياجماعة اللى عايز يتعلم صيانة الاب توب من الألف للياء يتفضل Twitter FaceBook Google+


اتفضلو دة الشرح بالصور لتغير الشاشة

بس ارجو من السادة المشرفين والقائمين على المنتدى تثبيت الموضوع حتى تعم الفائدة

استحلفكم باللة ان تدعو لى ولوالدى بالتوفيق والهداية

لا الله الا انت استغفرك واتوب اليك انى كنت من الظالمين

Posts filed under 'LCD Screen Repair'


What can you do if the laptop LCD screen turned completely white? From my experience I can tell that this problem may be related to the following:
1. Loose connection between the video cable and the LCD screen.
2. Defective LCD screen.
3. Defective motherboard (I assume the graphics card is integrated into the motherboard).

Here’s an example of a laptop with white screen. When you turn on the laptop, it starts but the image on the screen is completely white right from the beginning. In my case it was a Toshiba Satellite M45 laptop but this problem may occur with any other brand.


Most likely you still can use the laptop with an external monitor. Just connect the monitor to the VGA port on the back or side of your laptop and then switch the video output from internal to external mode.
On Toshiba laptops you can toggle between internal and external screens using Fn+F5 keys. Hold down Fn and press on F5 until you get video on the external monitor.
On IBM laptops use Fn+F7.
On HP laptops use Fn+F4.
It’s possible that you have to use a different key combination on your laptop but you get the idea.
On some laptops, in order to be able to use the external monitor, you have to connect it to the laptop and then restart the laptop so the external monitor is detected by the laptop.

I noticed that in some cases the laptop screen may turn white because of poor connection between the video cable and the LCD screen. If you want to check this connection, you’ll have to take apart the display panel because the connector is located on the back side of the LCD screen.
These laptop service manuals and disassembly instructions may be useful.

I always check the video cable connection first. Reconnecting the video cable may fix your problem.
If reconnecting the video cable doesn’t help, most likely you have a problem either with the LCD screen or with the motherboard.

The best way to find out witch one is causing the problem is testing the laptop with another working LCD screen. Without this test you’ll have to guess because as I mentioned before this could either bad motherboard or bad LCD screen.
You’ll have to disconnect the video cable from the LCD screen (connector 2) and the inverter board (connectors 3 and 1). After that you connect another working screen and test video.

For this purpose I’m using one of my test LCD screens. My test screen is cracked and because of that you see a wide white band in the center but it still works fine for this test.
The original screen is white but my test screen works normal (except the crack of course) and I can see the image. After this test I can tell that the problem must be related to the screen.

After I assembled everything back together and connected the original LCD, it’s still white.


التعديل الأخير تم بواسطة : qazxswedccc بتاريخ 08-05-2008 الساعة 11:21 AM
اعلانات

qazxswedccc
:: مهندس ::
تاريخ التسجيل: Jun 2007
المشاركات: 24
نشاط [ qazxswedccc ]
قوة السمعة:0
قديم 08-05-2008, 11:09 AM المشاركة 2   
افتراضي ازى تغير backlight lamp بتاعة اللاب توب


In this guide I will disassemble a laptop LCD screen in order to remove and replace the backlight lamp (CCFL).
Replacing the backlight lamp is not an easy task even for experienced technicians. If you do something wrong you will permanently damage the LCD screen and have to buy a new one. Proceed on your own risk and do not blame me.
Some recommendations before you start:
1. Work in a clean room. You don’t want dust and lint inside your LCD screen.
2. Make notes, so you know how to assemble your screen back.
3. Take pictures.
4. Before you remove something, take a closer look at the part and memorize how it is assembled.
5. When you are assembling the screen, remove dust and lint with compressed air. Do not use cloth.
The backlight lamp (CCFL) is located inside the LCD screen, so we are going to take it apart. In this article I’m not going to explain how to remove LCD from a laptop, it’s been covered before.

Remove sticky tape and foil from the back of the screen and glue it somewhere so you can reuse it later, when you assemble the screen.

Removing tape from the backlight cables.

On my screen the green circuit board was glued to the plastic frame with a double sided tape. Carefully unglue the circuit board. Be very careful, do not flex or bend the circuit board.

The circuit board has been unglued.

Place the LCD screen on the side and start removing the metal frame witch secures the LCD to the plastic frame. There will be many latches on all sides of the frame, you can unlock them with a small screwdriver.

Continue separating the metal frame from the plastic base.

On the following picture you can see that frame, LCD with the circuit board and screen base have been separated. Be careful, do not touch internal components with your fingers. Handle all internal components by the sides.

Place the metal frame and LCD with the circuit board aside. You’ll need them only when you assemble everything back together.

There will be a few transparent layers inside. Carefully remove them from the screen base. Do not separate the layers, just put them aside together.

Keep everything organized, so you have no trouble assembling the screen.

Start removing the metal cover from the backlight lamp (CCFL).

The backlight cover has been removed.

The backlight lamp (CCFL) cables are routed through small plastic hooks.

Unroute the backlight lamp cables.

Now probably the hardest part in this disassembly process - removing the backlight lamp and reflector. The backlight lamp is secured inside the reflector so you have to remove both and then separate them.
Before you remove the backlight lamp and reflector take a closer look how it’s assembled and mounted to the screen base. Fitting the backlight and reflector back in place could be a very challenging task.

The reflector is glued to the screen base with a double sided tape.

After the reflector has been unattached from the screen base, you can start removing the backlight lamp. As you see on the picture, I marked the left side of the reflector with a red dot so I know where the red cable goes when I assemble everything back together.

The backlight lamp (CCFL) has been removed from the reflector.

In order to access the backlight lamp leads you’ll have to remove the rubber caps from both side of the lamp. I’m not sure if you can touch the backlight lamp with your fingers, so I would use rubber gloves.

Cabled on both sides of the backlight lamp are soldered to the backlight leads. In order to access the leads you’ll have to remove the black insulator on both side of the lamp.
Unsolder both cables from the old backlight lamp and solder them to a new one.

You can test the new backlight lamp (CCFL) before you install it back into the screen. Connect the backlight lamp into the inverter board and turn on the laptop. The backlight lamp should light up.
From my experience, on some laptops the backlight lamp will not light up until the video cable is connected to the LCD screen. In this case you’ll have to assemble the LCD screen and then test it.


التعديل الأخير تم بواسطة : qazxswedccc بتاريخ 08-05-2008 الساعة 11:12 AM
اعلانات اضافية ( قم بتسجيل الدخول لاخفائها )
  

qazxswedccc
:: مهندس ::
تاريخ التسجيل: Jun 2007
المشاركات: 24
نشاط [ qazxswedccc ]
قوة السمعة:0
قديم 08-05-2008, 11:17 AM المشاركة 3   
افتراضي ازى تصلح شاشة وقع عليها مية تعال كدة شوف


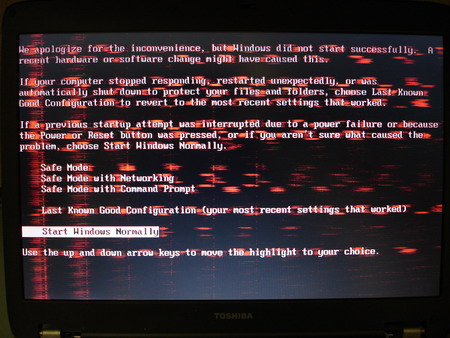
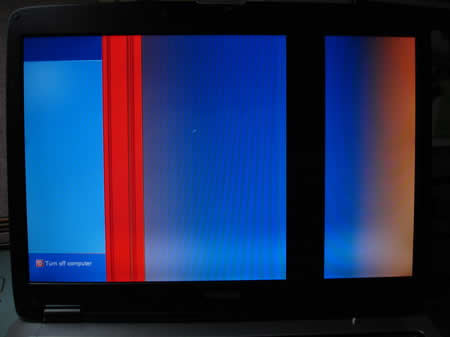
Yesterday took apart and repaired my notebook LCD screen with water damage. The screen itself was working just fine but it had two different problems.
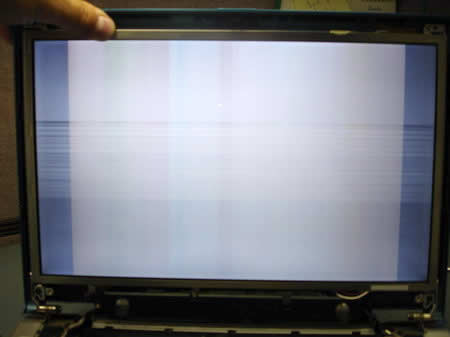
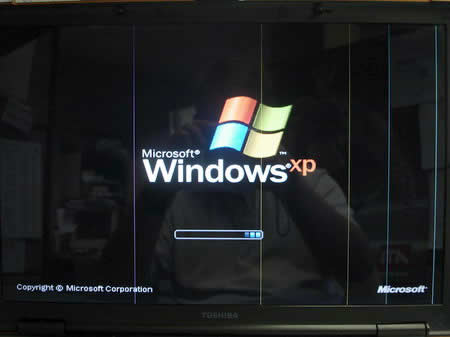
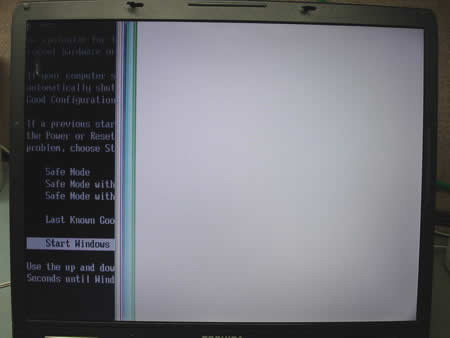
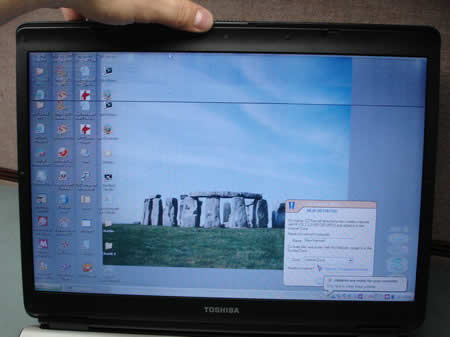
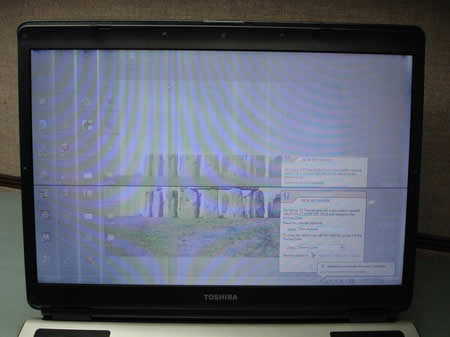
- previous owner spilled water on the laptop. Somehow the water got inside the LCD screen and left stains inside the screen. The water marks were very noticeable on a white background and it was very irritating.
- the screen also had dust and lint inside also very noticeable on a white background. I have no idea how it got in there but I decided to clean it up too.
To fix both problems I had to open up the LCD screen. This was my first experience on opening a notebook screen. I was pretty confident because I didn’t really care if I break the screen, I just wanted to know if it’s possible to fix it.
Warning: the LCD screen can be easily damaged if you open it up. If you do something wrong the screen might become completely unusable and you’ll have to buy a new screen. It’s very expensive. Think twice before you decide opening the screen. Continue at your own risk.
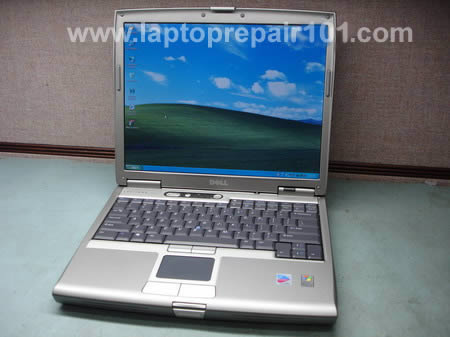
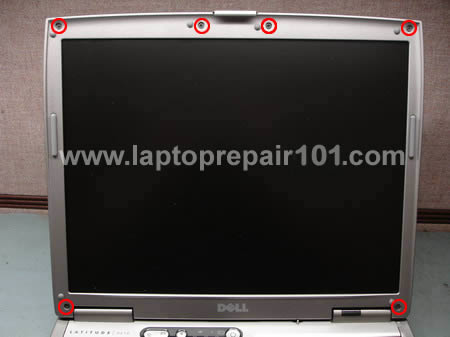
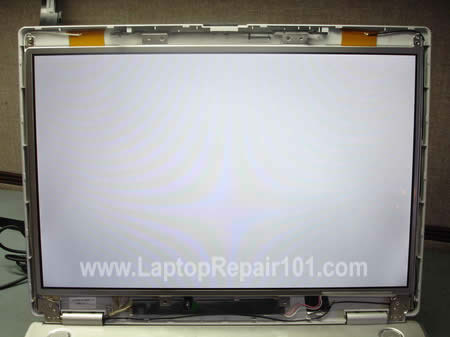
Here’s my Dell Latitude D610 notebook with water damaged screen I’m going to take apart.
First of all remove the battery from the notebook.


Lift up rubber screw seals and remove all screws.

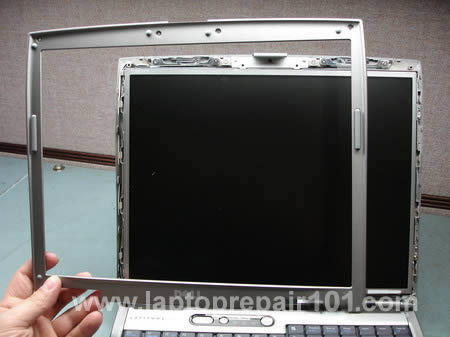
Carefully separate the screen bezel from the LCD cover and remove the bezel.

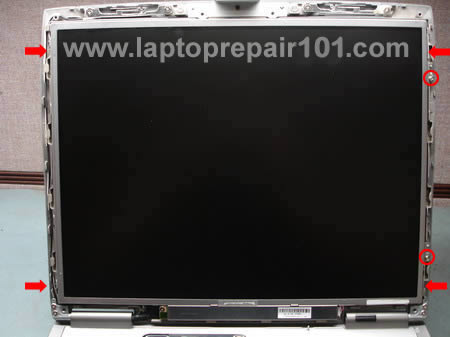
Remove two screws from the front and two screws from both sides.

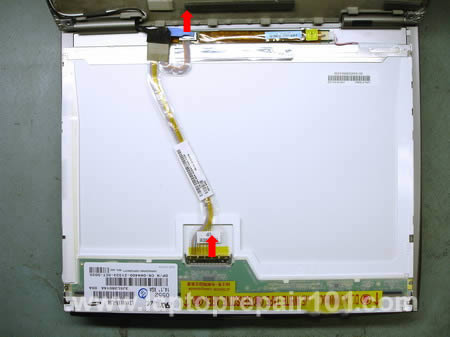
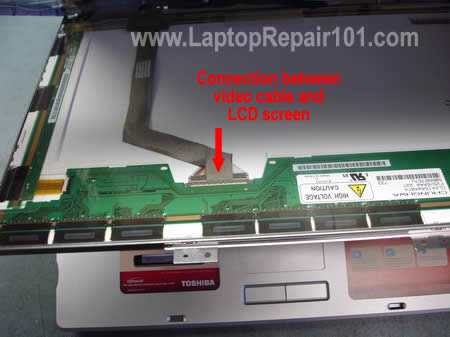
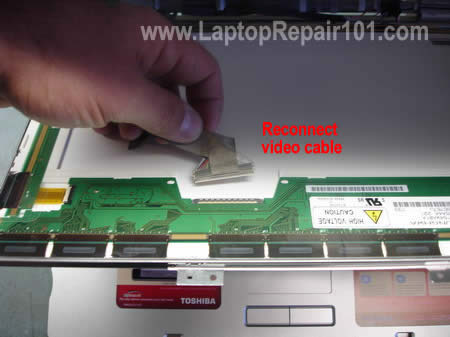
Carefully remove the LCD screen from the cover and place it on the notebook base. Disconnect the video cable and the inverter board cable.

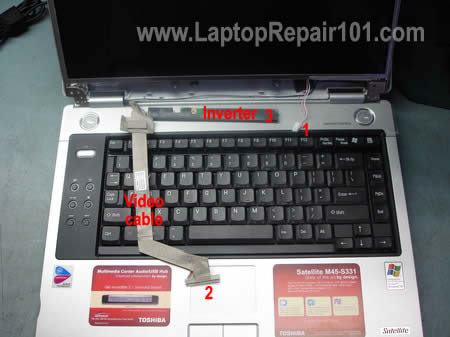
On this model the inverter board is attached to the screen with two screws. Remove both screws, disconnect the screen cable and remove the inverter board.

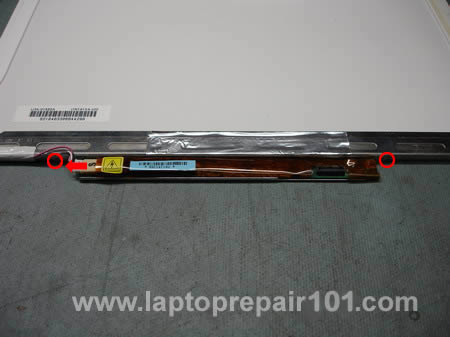
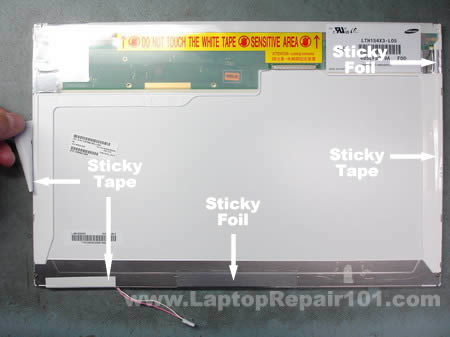
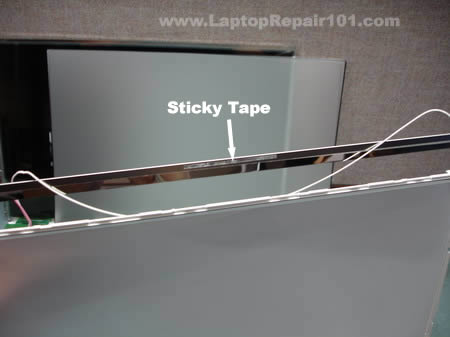
Carefully peel off sticky tape and foil and put it aside. You’ll have to put it back in place during the screen reassembly.

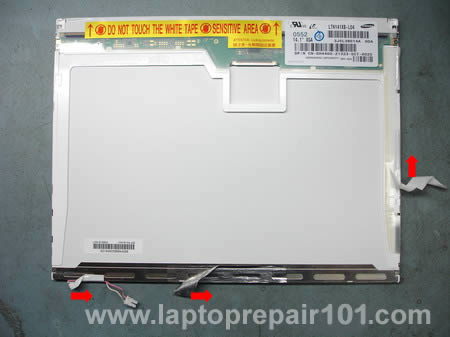
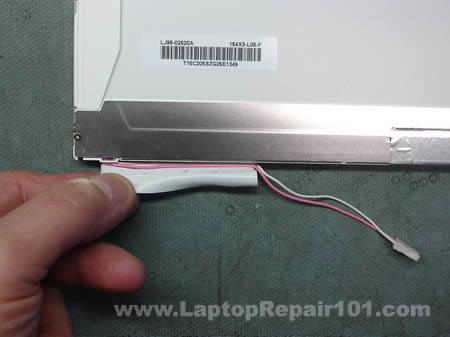
Remove two screws from both sides of the screen.

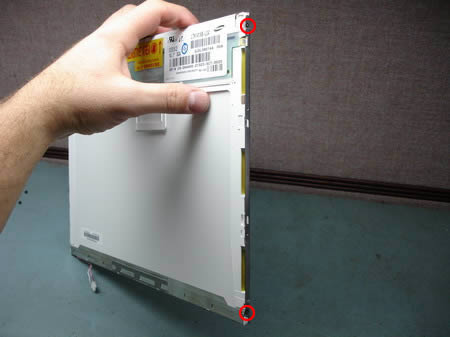
Carefully place the screen upside down on a flat surface. Carefully unglue the film that covers the circuit board and remove two screws from the board (top circles). I wasn’t really sure if I have to remove screws on the bottom, so I removed them just in case. Do not touch the circuit board with fingers.

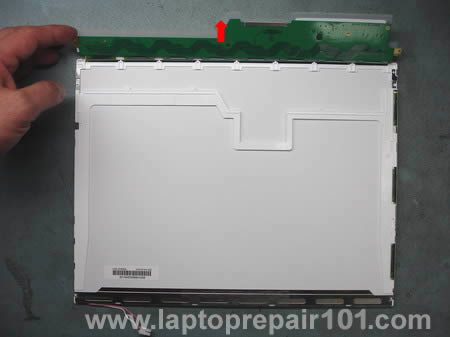
After both screws are removed you should be able to lift up the circuit board. Be careful, it’s still attached to the LCD.

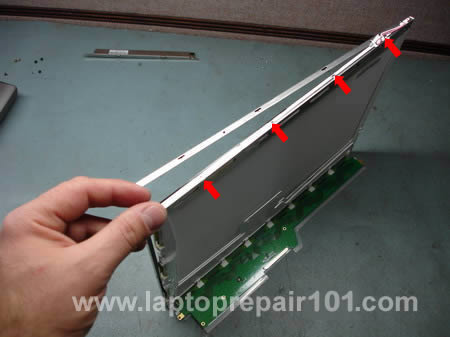
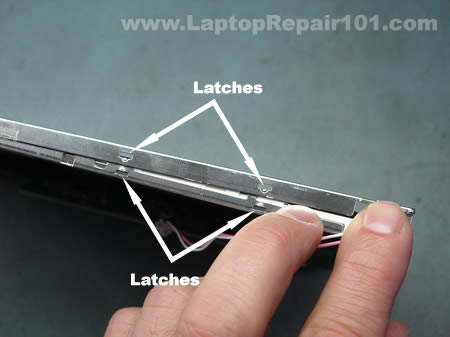
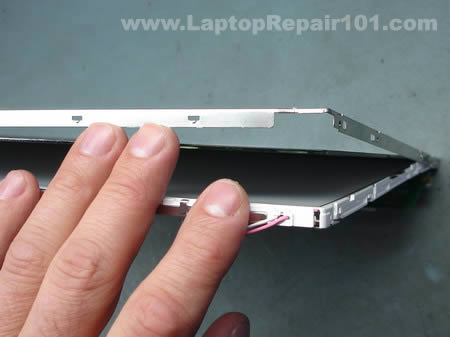
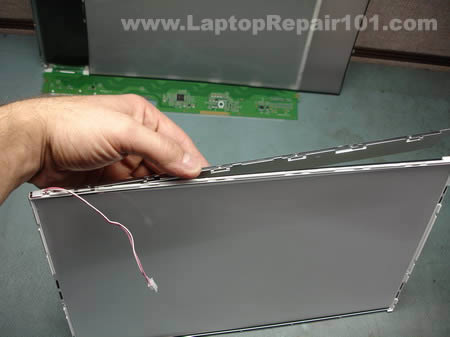
Start unsnapping the metal frame from the screen. There are a lot of latches on all sides of the screen. You can unlock them with nails or a small flathead screwdriver.

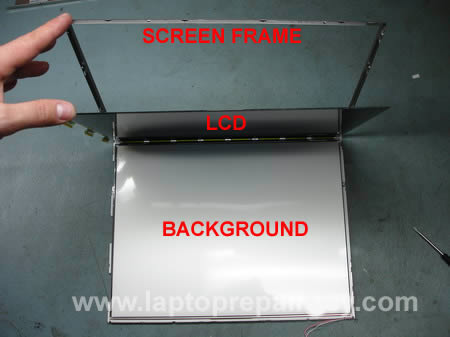
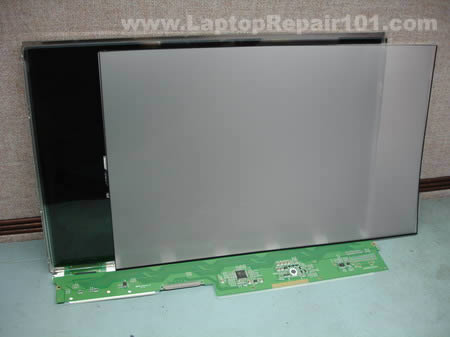
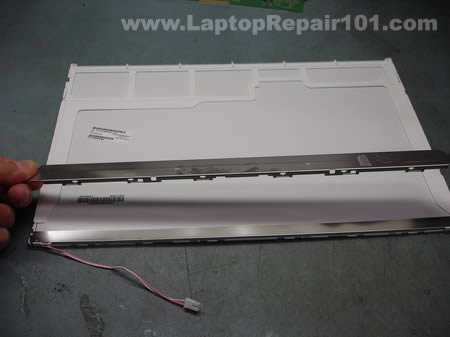
After all latches are opened you should be able to separate the screen into three pieces: metal frame, LCD and background (not sure about correct technical name).
If you have lint or dust inside the screen, probably you’ll find it between the LCD and the background. Do not touch LCD or background with your fingers. I was able to remove dust and lint up with a very soft cloth, barely touching the LCD and background surfaces.
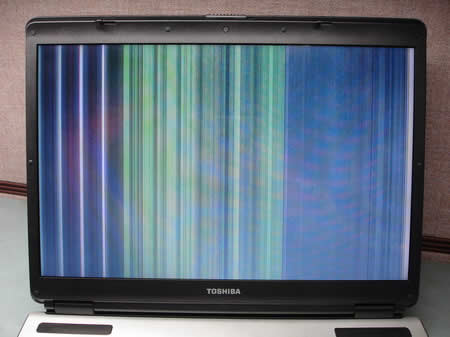
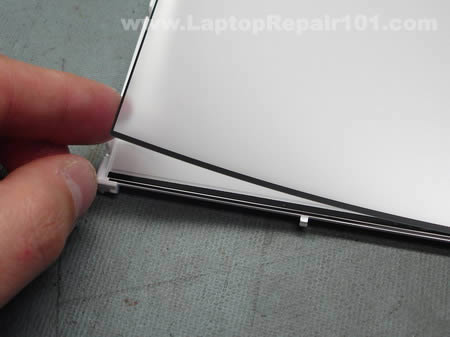
After I split the screen I found that the background has a few some kind of optical layers (three transparent sheets) and in my case they were damaged by water. The water dried out and left stains between these optical layers.
In my case removing dust and lint wasn’t enough and I had to go further.

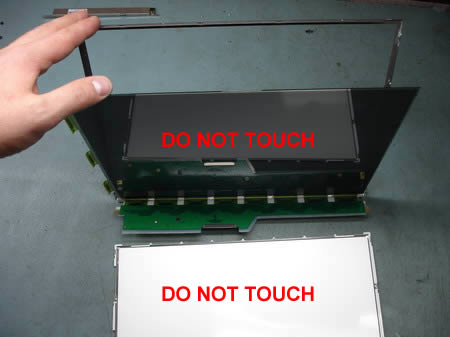
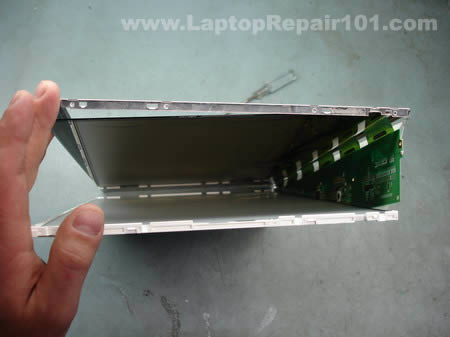
Very carefully separate the LCD with attached circuit board from the background.

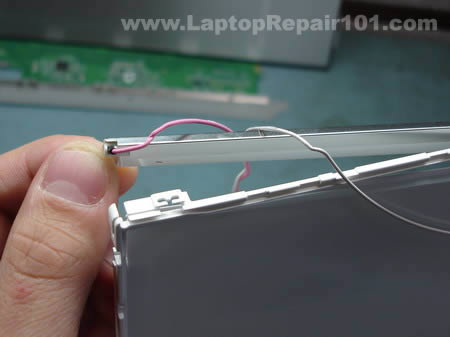
To remove damaged optical layers it’s necessary to remove metal locks on both sides of the screen. It’s like a small clip that keeps layers in place.

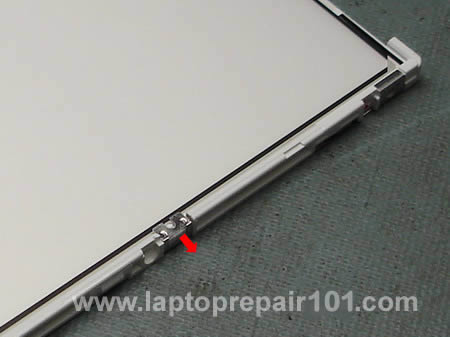
After I removed both clips, I was able to look between the layers. At first I tried to clean up the dried water marks with a soft cloth but it didn’t help. The stains were still visible and didn’t want to go away.
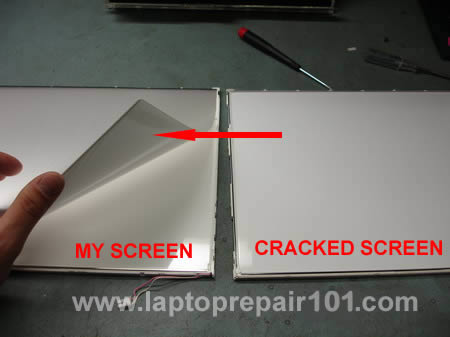
Fortunately I had another similar screen laying around, it had a cracked LCD. I decided to borrow the optical layers from the cracked screen and transfer them to my screen. I wasn’t sure if it’s going to work, but as I mentioned before I didn’t really care if I break the screen. It was just an experiment.
So I disassembled the cracked screen and carefully transfered the white background and all transparent layers to my screen.

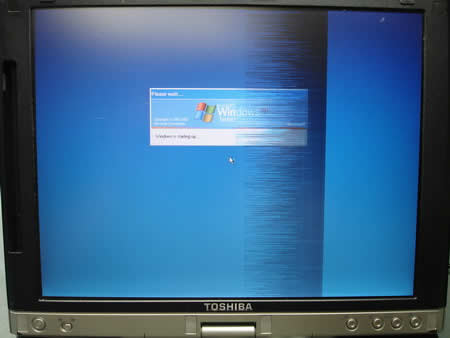
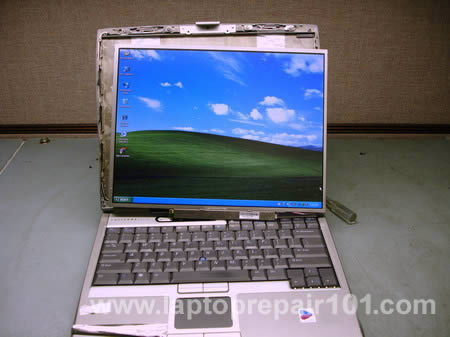
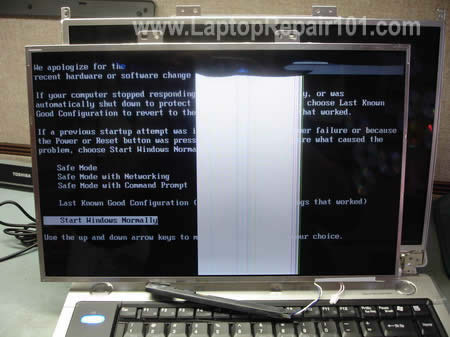
After that I assembled my screen back removing dust and lint with a very soft cloth. Breathlessly connected my new screen to the notebook. Turned it on and…
That’s a miracle, it works!
No dust, no lint, no water mars inside the screen! It’s clear and the background is absolutely clean!

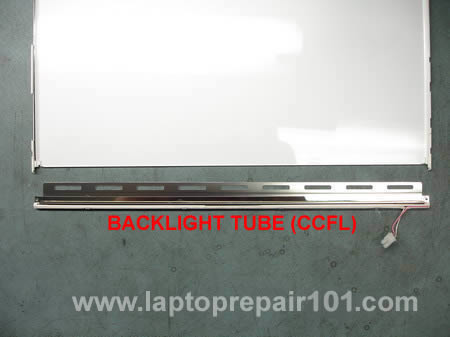
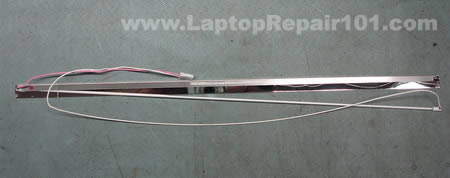
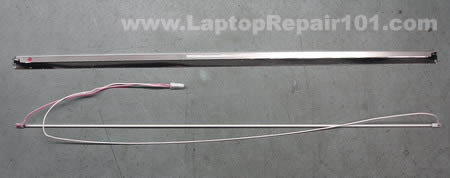
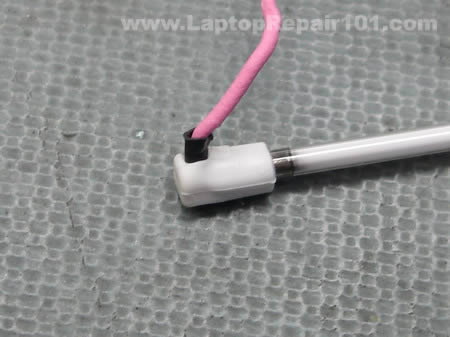
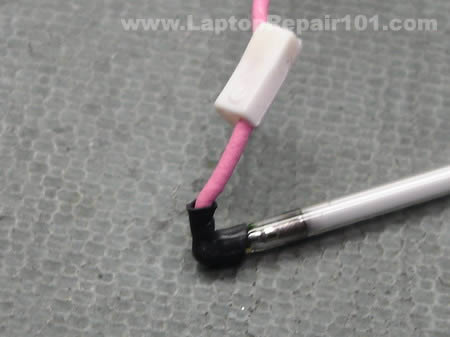
My donor screen had a cracked LCD but it had a good working backlight tube. The backlght tube is very fragile and it’s located inside a metal casing. I didn’t remove the backlight tube, I just broke off the entire metal casing from the plastic frame. I’m going to use this backlight tube for testing purposes.

If you fixing a Dell laptop yourself, probably you’ll need a service manual. Some Dell service manuals provide step-by-step laptop disassembly instructions.


qazxswedccc
:: مهندس ::
تاريخ التسجيل: Jun 2007
المشاركات: 24
نشاط [ qazxswedccc ]
قوة السمعة:0
قديم 08-05-2008, 11:26 AM المشاركة 4   
افتراضي بعض الصور لشاشات اللب اللى بيكون فيها مشكلة خطوط او نمش ......الخ


Here I’m going to post some laptop screen photos showing bad video output. I’ll explain what was wrong with the screen and how I fixed it. I plan to ad more examples as soon as I get new pictures. If you have your own example (and know how to fix it) please let me know and I’ll post it too.
Here’s some help for finding a correct part for your laptop.
Example 1.
Here’s a picture of Satellite M55 LCD screen I made this morning. I got this video output as soon as I started the laptop. There were a lot of vertical lines, and they were changing color without any pattern. To me it looked like Northern Lights (never seen in real life) 
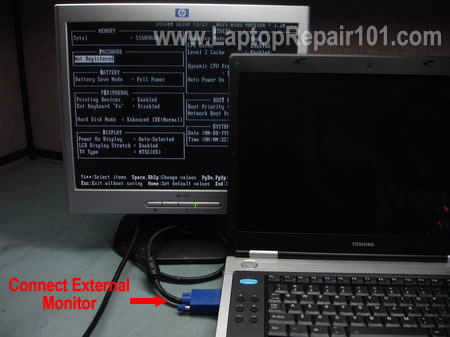
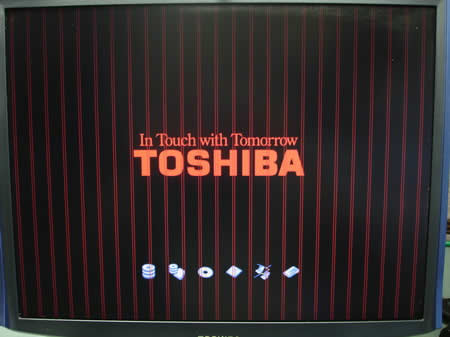
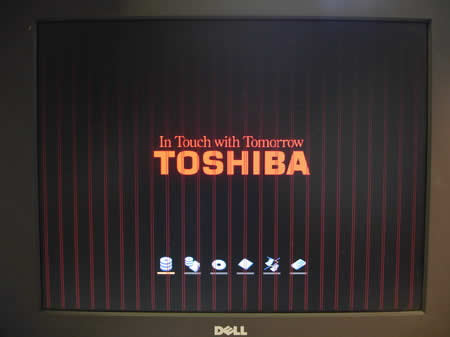
. The external monitor worked fine.

As soon as I applied some tension to the screen it changed the pattern. Some horizontal lines appeared in the middle of the LCD.

Here’s the difference. When I torque the screen, the image appears but it’s distorted with some horizontal lines running across the screen.
Reseating the video cable didn’t make any change and the problem was fixed after I replaced the LCD screen.
Example 2.
I took this picture from Toshiba Satellite M65. I think that this example is very typical. One day you wake up, turn on the laptop and see one or a few hair-like vertical lines in different colors.

When you move the LCD screen some lines might disappear or more lines appear on the screen. A video output on an external screen would be perfect, without any lines. Unfortunately, these lines indicate a screen problem. I’ve never seen this kind of video output caused by a bad video cable or bad FL inverter board. My laptop was fixed after I replaced the LCD screen.
Example 3.
The photo below comes from Toshiba Satellite 5205. The laptop displays identical vertical lines all over the LCD screen as soon as I turn it on. Sometimes these lines are red, sometimes they are blue, sometimes they become wider and change color to white.

The same pattern appears on the external monitor. It displays same vertical lines. When the same video defect appears on both monitors – internal LCD screen and external screen, then most likely it happens because of a bad video card. On some laptops the video card is integrated into the system board, on other models it’s a separate module.

In this example, the vertical lines were caused by a failed video memory on the system board. I’ve tested the video memory with Microscope utility and it failed the test. In Toshiba Satellite 5205 the video memory is integrated into the system board. To fix the problem, I’ll have to replace the board. (We do not have equipment to replace the memory module itself).
Example 4.
Here’s another example of a bad LCD screen. My bad! It wasn’t the LCD screen problem.

As soon as I turned on the laptop, I was getting these reddish marks on the LCD screen but not on the external monitor. Reseating and replacing the video cable didn’t help. The problem disappeared when I installed my test LCD screen. Yes, for some reason I wasn’t able to reproduce the problem on my test LCD screen. But the reddish video appeared again as soon as I replaced the screen. I guess it happened because the system board had some kind of intermittent problem with onboard video or video connector. Long story short, I had to replace the system board and it fixed the problem. Yep, I misdiagnosed this laptop.
Example 5.
Here’s one more example of a faulty LCD screen. The left half of the screen works just fine but the right side is completely white.

Example 6.
Here’s another laptop with a bad LCD screen. This time it’s a tablet PC.

Example 7.
This screen looks like the screen on the example 1. I hooked up an external monitor and the external video works perfectly fine.

Here’s the difference. When I torque the screen, the image appears but it’s distorted with some horizontal lines running across the screen.

After a few seconds the image washes away.

I had to replace the LCD screen.
Example 8.
This laptop displays inverted colors right from the startup. As you see, the Toshiba logo is light green instead of red. The background is light gray instead of black. The Intel logo should be blue on a white background but it is red on a black background.

When your laptop displays inverted colors as on the picture above, this is an indication of a bad screen. You’ll have to replace the screen.
Example 9.
Here are two more screens. In both cases this problem is related to the LCD screen, witch means the screen has to be replaced.
On the image below you see a white band running from the top of the screen to the bottom. This band appears right from the laptop startup and runs through the logo too.

On the following image only the left side of the screen is working properly. This problem is caused by faulty LCD screen.


qazxswedccc
:: مهندس ::
تاريخ التسجيل: Jun 2007
المشاركات: 24
نشاط [ qazxswedccc ]
قوة السمعة:0
قديم 08-05-2008, 11:31 AM المشاركة 5   
افتراضي عشان تغير اى قطعة فى اللاب توب مش بموديل الجهاز ولا نوع تعال نعرف كدة مع بعض


Here’s a good way to find inexpensive spare parts for your laptop or notebook computer. In most cases laptop parts are not interchangeable (except memory and hard drives) and it’s very important to use a correct part for repair or your computer will not work properly. You should search for spare parts by the part number.
1. Finding part number.
SparePartsWarehouse can help you to find the part number. On this website you can search for notebook parts by vendor. You’ll find part numbers for Compaq, HP, IBM, Sony and Toshiba notebooks.
Select your vendor/model line, choose laptop series and choose the laptop model. After that you can search through the entire list of parts for your laptop or just use the filtering tool to find a particular part. Each part usually has an original part number and an alternative part number. You can use either number. Now, when you know the part number, you can start searching for the best price.
2. Fining inexpensive parts.
First of all, try searching here. You can find a very inexpensive brand new part. If there are no new parts, you can buy a used one. If you cannot find this part on eBay, try searching by the part number on Google. Most likely the search will bring you many results and you will find what you are looking for.
Finally, when you receive the part, you can use laptop service manuals to install it.
UPDATE:
I just started a new project - free laptop repair related classifieds.
You can see this site here: Any Notebook Part
If you are selling new or used laptop parts, used laptops, you can place your ad on this site. It’s free.


qazxswedccc
:: مهندس ::
تاريخ التسجيل: Jun 2007
المشاركات: 24
نشاط [ qazxswedccc ]
قوة السمعة:0
قديم 08-05-2008, 11:36 AM المشاركة 6   
افتراضي اختبر مكونات اللاب توب وعمر البطارية وقدرتها وقدرة الجهاز وكل حاجة


Notebook hardware control and monitoring software is very neat utility for controlling hardware components on your notebook computers and it is free for personal use!
Using this utility you can:
- Monitor CPU clock, CPU load and CPU voltage
- Monitor CPU temperature and hard drive temperature
- Control CPU multiplier
- Control CPU warning and shutdown temperature
- Monitor hard drive SMART and temperature
- Monitor physical memory and virtual memory state
- Monitor battery status

I just found this software and still testing it. You can download notebook
ودة الينك للبرنامج
http://www.p35-forum.de/files/nhc_2....release_06.zip


qazxswedccc
:: مهندس ::
تاريخ التسجيل: Jun 2007
المشاركات: 24
نشاط [ qazxswedccc ]
قوة السمعة:0
قديم 08-05-2008, 11:40 AM المشاركة 7   
افتراضي ازى تعرف رمات اللاب توب فيها مشكلة ولا لا


A lot of laptop and desktop computer problems are caused by a failed memory or a failing memory module. As a laptop repair technician I test memory modules every time I get a laptop for repair. I have tried many different memory testing utilities but finally I stopped on Memtest 86+. So far it is one of the best free memory test utilities and I use it everyday. You can find this utility on the Memtest 86+ homepage.
To test your memory modules you have to do next:
  • download Memtest 86+.
Choose Download - Pre-Compiled Bootable ISO (.zip) if you want to burn it on CD.
Choose Download - Pre-Compiled package for Floppy (DOS - Win) if you want to place the utility on a floppy disk. I usually use CD because most computers have a CD drive and it’s much faster to start the test from a CD disc.
  • <LI class=MsoNormal style="TEXT-ALIGN: justify">Change the boot order on your computer to boot from a floppy drive or from a CD/DVD drive. <LI class=MsoNormal style="TEXT-ALIGN: justify">Insert the floppy disk or the CD disc with Memtest 86+ into the computer.
  • Start the computer.
If you did everything right, you computer will start from the floppy or the CD and the memory testing utility will start automatically.

If your memory passed the test, you will not see any red error messages.


I usually allow a memory module pass the test 4-5 times. I’ve seen many times that a failing memory doesn’t fail the test on the firs pass and then fails on the second or third pass.
If your memory failed the test you will see red error messages.


qazxswedccc
:: مهندس ::
تاريخ التسجيل: Jun 2007
المشاركات: 24
نشاط [ qazxswedccc ]
قوة السمعة:0
قديم 08-05-2008, 11:47 AM المشاركة 8   
افتراضي اوى تغير مدخل الكهرباء الخاص بى اللاب توب وتحديد اللى فى الصور لجهاز توشيبا


A bad connection between DC-IN power jack on the system board and the system board is a very common problem with Toshiba Satellite M35X and Toshiba Satellite A70/A75 notebooks. If your laptop is out of warranty, then you can fix the problem by resoldering DC-IN jack on the system board. If it’s still under warranty, it would be fixed at no charge to you.
Problem symptoms:
  • <LI class=MsoNormal style="TEXT-ALIGN: justify">Laptop randomly shuts down without any warning. <LI class=MsoNormal style="TEXT-ALIGN: justify">Power LED and battery charge LED start flickering when you wiggle the power cord or the AC adapter tip on the back or your laptop. <LI class=MsoNormal style="TEXT-ALIGN: justify">The battery will not get charged.
  • When you plug AC adapter, the laptop appears to be dead and there is no LED activity at all (DC-IN jack on the system board is broken).
To fix the problem, you have to take your laptop apart, remove the system board to resoleder or replace the DC-IN jack. Toshiba Satellite M35X and Toshiba Satellite A70/A75 disassembly guides will help you to remove the system board. Take a closer look at the power jack on the system board with a magnifying glass. In most cases you get the power problem because of a bad connection between the DC jack and the system board, you’ll see a crack between the DC jack connector and the system board.
Here is an example of Toshiba Satellite M35X power jack. The crack occurs between the DC jack pin and the system board.


In some cases the connection is good, but the DC jack is bad itself. You can find a new DC jack for Toshiba Satellite M35X and Toshiba Satellite A70/A75 laptops on eBay. Search for DC jack M35X or DC jack A75.
How to resolder laptop power jack yourself.
UPDATE:
Sometimes, after you replace the jack, you can see that the system board doesn’t get power at all. The battery will not charge and the power LED will not light when you plug in the AC adapter. So, here’s a possible explanation.
When a connection between the positive pin and the motherboard breaks (cracks), the power jack gets loose. You can feel it when you plug in the adapter plug. A loose power jack can damage the trace inside the hole in the system board. Take a look at the picture.

As you see, the positive pin goes through the hole in the system board and you solder it on the top side. Right? What if the trace between the top side and the bottom side is broken somewhere inside the hole? I’ve seen it before a few times. In this case everything looks nice and clean on the top side. When you plug in the AC adapter, you get normal voltage readings between “+” and “-“ pins on the top side, but the power DOESN’T go to the motherboard at all, because there is no connection between the top and bottom sides. Test with a multimeter if there is a connection between the top and the bottom.
If the trace inside the hole is broken you still can fix it. You can run a wire to connect the top and the bottom sides. Be careful not to short something on the board.
Update:
Here’s another solution to fix the power jack problem, it shows how to relocate the power jack outside the laptop base. Check it out here: Toshiba Satellite A75 failed power jack workaround.
When you repair a loose power jack, it’s a good idea to check the jack on both sides of the motherboard. When you remove the top cover from a Toshiba Satellite A70/A75 laptop you can see only points where the jack is soldered to the motherboard as it shown on the second picture in this post, but you cannot see the jack itself as it shown on the first picture.
Removing the motherboard from Satellite A70/A75 laptop is a good idea because the jack itself might has a broken “+” pin, as it shown on the picture below. If the “+” broke off the base, you’ll have to replace the jack.


إضافة رد

العلامات المرجعية

«     الموضوع السابق       الموضوع التالي    »
أدوات الموضوع

الانتقال السريع إلى


الساعة معتمدة بتوقيت جرينتش +3 الساعة الآن: 02:51 AM
موقع القرية الالكترونية غير مسؤول عن أي اتفاق تجاري أو تعاوني بين الأعضاء
فعلى كل شخص تحمل مسئولية نفسه إتجاه مايقوم به من بيع وشراء وإتفاق وأعطاء معلومات موقعه
التعليقات المنشورة لا تعبر عن رأي موقع القرية الالكترونية ولايتحمل الموقع أي مسؤولية قانونية حيال ذلك (ويتحمل كاتبها مسؤولية النشر)

Powered by vBulletin® Version 3.8.6, Copyright ©2000 - 2025