قسم صيانة شاشات LCD و البلازما و LED و OLED صيانة شاشة الكرستال المسطحة , البلازما , LCD , Plasma , Plazma , بلازما , فلات , L.C.D , LED , OLD


سمير حسانين
:: عضو ذهبي ::
تاريخ التسجيل: Aug 2007
الدولة: مصر- المنصورة
المشاركات: 2,128
نشاط [ سمير حسانين ]
قوة السمعة:
قديم 01-08-2010, 11:09 PM المشاركة 1   
افتراضي حل أي مشكلة الطاقة في شاشات الكريستال السائل f1723 إتش بي


كيفية حل أي مشكلة الطاقة في شاشات الكريستال السائل f1723 إتش بي

This HP1723 17” LCD Monitor came in with the complaint of no power.
HP1723 "17 وشاشات الكريستال السائل جاء ذلك في الشكوى مع أي من السلطة.
Upon further inspection I could hear a soft intermittent sound coming from the both front speakers.
على مزيد من التفتيش وكنت أسمع صوت متقطع لينة قادمة من جبهة المتكلمين على حد سواء.
Since the speakers can produce some sound, this indicates that the power supply should be working fine and it may be some bad components located at the secondary side that had caused the power supply voltage to drop not to start.
منذ مكبرات الصوت يمكن أن تنتج بعض الصوت ، وهذا يدل على أن إمدادات الطاقة ينبغي أن تعمل جيدا وأنه قد يكون بعض المكونات السيئة التي تقع في الجانب الثانوية التي قد تسبب في امدادات التيار الكهربائي لإسقاط السلطة لا لبدء.
The power LED doesn't light because the signal was coming from the Microcontroller (MCU) IC.
الصمام السلطة وليس لضوء الإشارة كانت قادمة من كولسترول (MCU) جيم.
This means that if the MCU did not receive the right voltage from the power supply, it will not send output voltage to the power LED.
يعني أنه إذا MCU لم تحصل على حق من الجهد والطاقة ، وإمدادات انها لن ترسل الإخراج إلى الجهد قوة هذا الصمام.
As usual, to open LCD Monitor cover , one have to be careful of not scratching or leaving a mark on the plastic casing otherwise the customer may not want to accept his or her broken or badly scratch LCD Monitor.
وكما جرت العادة ، لفتح غطاء شاشات الكريستال السائل ، واحدة يجب أن نكون حذرين من عدم خدش أو ترك علامة على غلاف من البلاستيك وإلا فإن العميل قد لا ترغب في قبول له أو لها كسر أو خدش سيئة وشاشات الكريستال السائل.
Once the cover have been removed, you have to remove another four screws (two at each side) in order to take out the power/inverter and the Main board. For some LCD Monitors, the moment you have open the cover, you could easily remove all the boards.
مرة واحدة تم إزالة الغطاء لها ، لديك لإزالة آخر المسامير الأربعة (اثنان في كل جانب) من أجل اخراج القوة / العاكس ولوحة التحكم الرئيسية. وبالنسبة لبعض شاشات الكريستال السائل ، لحظة لديك فتح الغطاء ، يمكنك بسهولة إزالة كافة المجالس.
The power supply and the inverter circuit are in one board while the Main board and the audio board are in separate board.
إمدادات الطاقة ودائرة العاكس في مجلس واحد في حين أن اللوحة الرئيسية والمجلس صوت في مجلس منفصل.
As mentioned before in my previous articles, I do not immediately begin to troubleshoot and repair any board unless I have scanned all the components with my eyes first.
كما ذكر من قبل في مقالاتي السابقة ، وأنا لا تبدأ على الفور لاستكشاف وإصلاح أي مجلس ما لم يكن لدي تفحص كافة المكونات مع عيني الأولى.
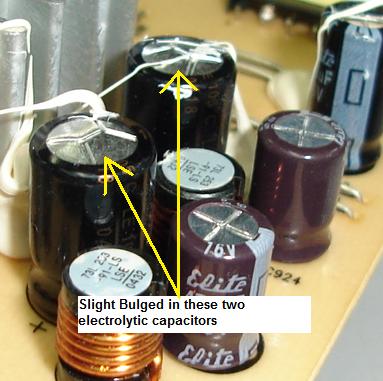
The power supply/inverter board look very new and the most obvious sign that I could see was two filter capacitors (1000uf 16 Volt) had a slight bulge on top of its casing.
التيار الكهربائي مجلس العاكس / نظرة جديدة واضحة جدا وتوقيع أقصى ما استطعت أن أرى وتصفية اثنين من المكثفات (16 1000uf فولت) كان له انتفاخ طفيف في أعلى الغلاف لها.
I believe these bulged electrolytic capacitors that had caused the power supply not to function properly.
وأعتقد أن هذه كهربائيا المكثفات انتفخ التي تسببت في إمدادات الطاقة لا تعمل بشكل صحيح.
I have checked all other e-caps too but all found to be good.
راجعت وسائر البريد قبعات للغاية ولكن كل وجدت لتكون جيدة.
Usually whenever a filter capacitor located at the secondary side of switch mode power supply (SMPS) have a too high ESR value, the voltage will drop more than half causing many circuits won't work.
كلما عادة مكثف التصفية التي تقع في الجانب الثانوي للتبديل وضع امدادات الطاقة (SMPS) لها قيمة عالية جدا اس ار ، والجهد وانخفاض اكثر من نصف الدوائر كثيرة تسبب لن ينجح.
Since I already found the bad e-caps, I have to be certain that the secondary diodes (this LCD Monitor is using Schottky diodes) don't go faulty or leaky too.
منذ وجدت بالفعل سيئة البريد القبعات ، ويتعين علي أن أكون على يقين من أن الثنائيات الثانوية (وهذا هو وشاشات الكريستال السائل باستخدام الثنائيات شوتكي) لا تذهب خلل أو تسرب للغاية.
Upon checking the Schottky diodes (part number are SRF20100C and SP10150) I found both of them to be working fine.
وعند التحقق من الثنائيات شوتكي (رقم الجزء وSRF20100C وSP10150) وجدت كل منهما أن يكون على ما يرام.
Replacing only the two bad e-caps with a good one solved the LCD Monitor problem.
استبدال اثنين فقط سيئة البريد مباراة دولية مع جيدة واحدة تحل المشكلة وشاشات الكريستال السائل.
Now get this, if you want to be good in any electronic equipment repair, if possible analyze other circuits too.
يحصل هذا الآن ، إذا كنت تريد أن تكون جيدة في أي إصلاح المعدات الإلكترونية ، وإذا أمكن تحليل دوائر أخرى أيضا.
That means if you every time replace only the fuse and the bridge rectifier you won't learn anything beyond that problem and you will get bored easily.
وهذا يعني إذا كنت في كل مرة سوى استبدال الصمامات والمقوم جسر أنك لن تعلم أي شيء وراء هذه المشكلة ، وسوف تحصل على بالملل بسهولة.
Let's take my case for example, after the replacement of the capacitors I will usually analyze other circuits too like finding out what kind of part numbers certain components are using, which type of the inverter circuit is belong to ie Buck Royer or direct drive?, why each backlight circuit are using four ballast capacitors?, How many backlights the LCD Monitor is using, what is the inverter IC part number, what is the supply voltage to the inverter IC?
دعونا نلقي حالتي على سبيل المثال ، بعد استبدال المكثفات وسوف يحلل عادة دوائر أخرى أيضا مثل معرفة أي نوع من جانب أعداد مكونات معينة تستخدم ، أي نوع من دائرة العاكس هو ينتمي إلى أي باك روير أو محرك المباشر؟ ، لماذا كل دائرة الضوء الخلفي تستخدم المكثفات الصابورة أربعة؟ ، كيف الإضاءة الخلفية العديد من شاشات الكريستال السائل يستخدم ، ما هو العدد جيم العاكس جزء ، ما هو امدادات التيار الكهربائي إلى جيم العاكس؟
How many LED bar lighted up when test on the secondary winding of the high voltage transformer?
كيف شريط الصمام العديد من مضاء عند الاختبار على انهاء الثانوية للمحول الضغط العالي؟
What would happen if I pull out one of the backlight (will it still work or shut down?). What is the brightness line voltage if set to minimum and maximum?
ماذا سيحدث لو سحب واحد من الضوء الخلفي (فإنه لا يزال العمل أو إيقاف؟). ما هو الجهد خط سطوع إذا لتعيين الحد الأدنى والحد الأقصى؟
You have to answer all of these questions if you want to be good at LCD Monitor repair.
لديك للرد على جميع هذه الأسئلة إذا كنت تريد أن تكون جيدة في إصلاح شاشات الكريستال السائل.
You can apply this kind of questions on other electronic equipment too.
يمكنك تطبيق هذا النوع من الأسئلة على المعدات الإلكترونية الأخرى أيضا.
This is a continuous process of learning how to be good in electronic repair.
هذه عملية مستمرة من التعلم كيف تكون جيدة في إصلاح الإلكترونية.
I don't want you to replace caps or fuse everyday without knowing how other circuits function or what are the components used in other circuits.
أنا لا أريد منك أن تحل محل القبعات أو فتيل كل يوم دون ان تعرف كيف تعمل الدوائر الأخرى أو ما هي المكونات المستخدمة في الدوائر الأخرى.
Although to analyze other circuits take you lots of time but I can guarantee you that the time you have spent are worth it.
على الرغم من أن لتحليل دوائر أخرى تأخذ لك الكثير من الوقت ولكن استطيع ان اؤكد لكم ان الوقت الذي قضى ويستحق كل هذا العناء.
You won't be able to go far if you have set your thinking by just changing components and not knowing the surrounding.
أنت لن تكون قادرة على الذهاب بعيدا إذا كان لديك مجموعة التفكير فقط عن طريق تغيير مكوناتها ومعرفة لا المحيطة بها.
If you want to improve in electronic repair then you need a change of mindset in you and only you yourself can make the different!
إذا كنت ترغب في تحسين وإصلاح الالكترونية ثم كنت في حاجة الى تغيير في التفكير وأنت وأنت فقط يمكن أن تجعل من نفسك مختلفة!
Try this approach and I believe troubleshooting electronic will never be the same again.
حاول هذا النهج ، وأعتقد أن مخرج الإلكترونية لن يكون نفسه مرة أخرى.
Have a great and a fantastic year!
لديك كبيرة ورائعة في السنة!
منقول

اعلانات

سمير حسانين
:: عضو ذهبي ::
تاريخ التسجيل: Aug 2007
الدولة: مصر- المنصورة
المشاركات: 2,128
نشاط [ سمير حسانين ]
قوة السمعة:
قديم 01-08-2010, 11:15 PM المشاركة 2   
افتراضي


How To Repair Dim Display in BenQ FP71G+ 17” LCD Monitor
Normally for this BenQ FP71G+ LCD Monitor with the model of Q7T4 the major complaint was display appears for a while and then shutdown (cut off) but for this unit the complaint was dim display! That means you don’t have the chance to see the bright BenQ logo the moment power is “On”. If you look at the screen closely you could actually see the picture except that the display is very dark. If you could see the display, this means that the Main board, power board and the LCD Panel are working!

There could be two reasons, it is either the backlights have problem or the inverter board is faulty. Since most of the LCD Monitors in the market have top and bottom backlights, chances for both the top and the bottom backlights failed at the same time is very slim. Due to this description, I have eliminated backlights as the cause of the problem. So my concentration will be in the inverter board. Now this assumption came across my mind even before the LCD Monitor cover was removed! It is good to assume and expect which circuit that causes the problem as this will motivate you even more if the assumption is correct. Many suggestions came out from your mind and you have to decide for the best. If the assumption is wrong, then you have to ask yourself is there anyway you can improve it. Don’t put too much pressure on yourself if the assumption is way off from what you have expected, as learning from our own mistakes is the best guide for us!


The moment the metal casing was removed, I could clearly see a burnt mark surrounding a transistor located at the inverter board area. My assumption was right about the inverter circuit fault and upon close inspection; the slightly dark transistor has the part number of FQU11P06. It is a P-channel FET transistor and it can be replaced with part number FU9024N. The area now has darkened and if you directly install a new transistor in it, I believe the darkened area could cause intermittent problem or total destruction again to the new transistor! Why? It is because the darkened area has become carbonized and current can flow to other circuits causing the transistor to go shorted again. In order to eliminate this problem, one has to scrap off the darkened area and due to the board is so fragile; the only way you can do is to make one hole in the area. Clean the area with thinner and install the new transistor and it should not have problem after that.


Another thing that arises in my mind was is it the transistor itself has problem that goes shorted and burnt the board or other components failure that caused the transistor to go shorted? I began to check the surrounding components that have relation with the burnt transistor and found the tuning capacitor ESR value have increased, one of the push pull transistor (C5707) shorted and the Pico fuse open circuit! Upon close inspection of the capacitor, I could see bulged at one side of the capacitor.


The value of this bad plastic film polyester type capacitor is .22 uf 160 Volts. If you test this capacitor with a digital capacitance meter, it would show about .2 uf which you may think is acceptable. If you didn’t replace this capacitor, the newly installed transistor (FQU11P06) would surely burn again. For your information, any non polarity capacitors that have the value of or higher than .1uf (104), besides test it with digital capacitance and analogue meter, I will also use ESR meter to check the ESR value of the capacitors too. In the above case, the bad cap has 47 ESR Ohm and the good one has 7.2 ESR Ohm!


Do you know that, if you owned either the dick smith or the Blue ESR meter by bob parker, besides testing the electrolytic capacitor, you can also use it to test on the non polarity capacitor too? But the non polarity capacitor value must me around .1uf or higher. The ESR meter can’t test any value which is lower than that. If you do not have any ESR meter, I guess this is the time now to invest one to speed up your repair. With the help of ESR meter, I have solved lots of intermittent problem caused by capacitors. Some intermittent capacitor problem can’t be revealed with the help from applying freezer and heat but surprisingly it can be discovered faulty by using ESR meter- this really amazed me! If you want to buy the Blue ESR meter, you can click on the link here Blue ESR meter.


Next, checking around all the circuit, I found another electrolytic capacitor have problem too. The faulty capacitor is located at the secondary output side and act as a filter to remove ripple along the output line. A good 1000 uf e-cap should have ESR less than .1 Ohm but the faulty one read 4.9 ESR Ohm! A new replacement of the Pico fuse, C5707 transistor, FQU11P06 FET, 1000uf 16Volts e-cap and .22uf 250V metallised polyester capacitor brought the LCD Monitor back to life again.


اعلانات اضافية ( قم بتسجيل الدخول لاخفائها )

سمير حسانين
:: عضو ذهبي ::
تاريخ التسجيل: Aug 2007
الدولة: مصر- المنصورة
المشاركات: 2,128
نشاط [ سمير حسانين ]
قوة السمعة:
قديم 01-08-2010, 11:17 PM المشاركة 3   
افتراضي


About C5707 Transistor Replacement In BenQ T705 (Model Q7T4) 17” LCD Monitor


This BenQ T705 LCD Monitor has a common fault of display shutdown after few you “On” for few seconds. The cause of the problem was usually a shorted one or two of the C5707 push pull transistors. Besides the shorted transistor, one also has to check the tuning capacitor for high ESR value with the help of ESR meter. If you do not own one, you can use the digital capacitance meter to check the capacitance value. However, from my experience, checking only the capacitance value doesn’t guarantee that the capacitor is good unless you confirm it with ESR meter. The reason why I emphasis on checking this tuning capacitors was because the capacitors have a high failure rate that could cause the C5707 transistor to go shorted. You also have to observe the high voltage transformer pins carefully. I had come across quite a number of shorted C5707 transistors caused by dry joints in pins of the high voltage transformer.


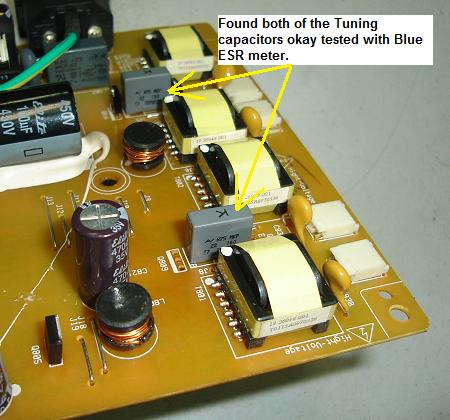
In this case, as usual after I have confirmed that only two C5707 transistors shorted, I began to test the tuning capacitors and check the pins of the high voltage transformer. Both the tuning capacitors found to be okay but there were dry joints in the transformer pins. Fresh solder was applied to the high voltage transformer pins and I’m ready to “On” the LCD Monitor. Guess what? The Monitor has the same symptom again which is display shutdown after few seconds! I don’t believe it as most of the time it will surely work as this is a common fault!


I started to recheck the surrounding components that have connection to the C5707 transistors but found no faults in it. Analyzing the board many times didn’t reveal any improper soldering job. There must be something that has gone wrong that had caused the LCD Monitor to shutdown. Deep in my heart I don’t suspect backlights problem because the C5707 transistors shorted was caused by dry joints in the high voltage transformer. Beside, the backlights were quite reliable for this BenQ LCD Monitor model.


Thinking back, I bought a new badge of C5707 transistors from my electronic suppliers not long ago. The middle pin (leg) is a bit shorter than the other two as shown from the photo below. I thought to myself would it be this badge of transistors that have problem causing the display shutdown after few seconds? Of course I can’t blindly suspect the transistors unless I have some proof of it. The finding begins………………


Testing the C5707 transistor with an analogue meter set to X 1 and to X 10 K Ohm doesn’t seem like it has problem. Comparing the result with an original C5707 transistor did have some difference in the X 10 K Ohm range but the reading is acceptable from my years of experience in testing transistor. The only thing that I haven’t compared is the Hfe reading (forward current gain). I used the famous Peak Atlas components analyzer to analyze both transistors and I could clearly see the big difference between the Hfe readings of the two transistors. The original C5707 transistor has Hfe value of 379 while the new badge of the C5707 transistor has Hfe value of 161! At last I found the answer!


I did tried replace the 4 C5707 transistors at one go with the new batch of transistors but the result was the same. Installing the transistors that have the Hfe reading of 350 to 400 solved the display shutdown problem. This circuit look like it can only work with the same type of transistor that has the quite exact Hfe value! That’s why for this type of Monitor circuit, many technicians hardly can find a suitable replacement. In other words, even if you could get the substitution transistor that have higher Volt, Amp and Watt but different Hfe value, you still won’t be able to bring the LCD Monitor back to life again. From the above test, this Monitor circuit has voice out loud and clear that it only need the same part number with the same Hfe value unless you have some similar transistor replacement specification that is identical to the original one. I will go back to my electronic supplier to tell them about his problem and hope to get back the same type of C5707 transistor.


For my readers that are in this electronic repairing line, although some of you may not be in the LCD Monitor repair, I hope you will absorb this information and apply it in your field. Who knows one day you would have face the same problem that I’m facing and this article could easily help you to solve your problem fast. Have a good and a blessed day


الصورة الرمزية احمد حمادي
احمد حمادي
:: مشرف ورشة التلفزيون ::
تاريخ التسجيل: Mar 2009
الدولة: فلسطيني/ لبنان
المشاركات: 6,655
نشاط [ احمد حمادي ]
قوة السمعة:
قديم 02-08-2010, 04:11 PM المشاركة 4   
افتراضي


موضوع ممتاز
مشكور مهندس سمير


الصورة الرمزية khalloq
khalloq
:: عضو ماسى ::
تاريخ التسجيل: Jun 2007
الدولة: المغرب
المشاركات: 4,928
نشاط [ khalloq ]
قوة السمعة:
قديم 03-08-2010, 02:22 AM المشاركة 5   
افتراضي


المهندس الكبير سمير موضوع ممتاز وفي غاية الاهمية
الصور خير دليل بارك الله فيك


ABO-MALK
:: مهندس متواجد ::
تاريخ التسجيل: Feb 2010
المشاركات: 141
نشاط [ ABO-MALK ]
قوة السمعة:
قديم 05-08-2010, 11:28 PM المشاركة 6   
افتراضي


مجهود رائع كل الشكر


الصورة الرمزية Fady yehia
Fady yehia
:: عضو ذهبي ::
تاريخ التسجيل: Feb 2006
الدولة: Egypt
المشاركات: 784
نشاط [ Fady yehia ]
قوة السمعة:
قديم 28-10-2010, 06:25 PM المشاركة 7   
افتراضي


جميل جدا هذا المقتطف من كتاب جيستن يانج ومحاولة تعريبة وفهم ما به.

ولكن التعريب عن طريق جوجل يفقد الموضوع اهميته ويدخل المتلقي في متاهة.

أقترح : تقسيم الكتاب لعدة اجزاء ويكون لكل عضو نصيب في تعريبه بطريقة سليمة وعملية . واعادة تجميع الأجزاء بعد تعريبه. ليكون مرجع للعاملين بالصيانة. حيث انه من أكثر الكتب التي صادفتها اتقانا في الشرح العملي.

هذه فكرة ارجو التفاعل معها . حتي نرتقي بفكر كل من يدخل هذا المجال.


المهندس تك
:: مهندس ::
تاريخ التسجيل: Apr 2007
المشاركات: 8
نشاط [ المهندس تك ]
قوة السمعة:
قديم 27-11-2010, 02:38 AM المشاركة 8   
افتراضي


ياريت يابشمهندس سمير تحط لنا رلبط لتحميل كتاب جيستن يانج

لأني حاولت أنزله وما وجدته إلا بفلوس


الساعة معتمدة بتوقيت جرينتش +3 الساعة الآن: 07:41 PM
موقع القرية الالكترونية غير مسؤول عن أي اتفاق تجاري أو تعاوني بين الأعضاء
فعلى كل شخص تحمل مسئولية نفسه إتجاه مايقوم به من بيع وشراء وإتفاق وأعطاء معلومات موقعه
التعليقات المنشورة لا تعبر عن رأي موقع القرية الالكترونية ولايتحمل الموقع أي مسؤولية قانونية حيال ذلك (ويتحمل كاتبها مسؤولية النشر)